Setting up your Android smartphone for the first time: tips and tricks
If you've just bought a shiny new smartphone or tablet, you'll probably want to start playing with it right away. Before that, you'll need to configure it first. In this beginner's article, we'll give you a step-by-step guide on how to set up your new Android smartphone.
Each Android device is different, and each manufacturer gives its own devices little extras that make them stand out from the crowd of competitors. Deep down, Android devices are ultimately similar.
Skip to step:
- Select a language
- Insert the SIM card and enter your PIN
- Select a Wi-Fi network
- Transfer from another device
- Set up/login to Google account (optional)
- Protect your phone
- Set up notifications
- Set up Google Assistant
- Other services
- Insert your microSD card (if you have one)
- Download apps from the Google Play Store
- Install software and Android updates
- Personalize your phone
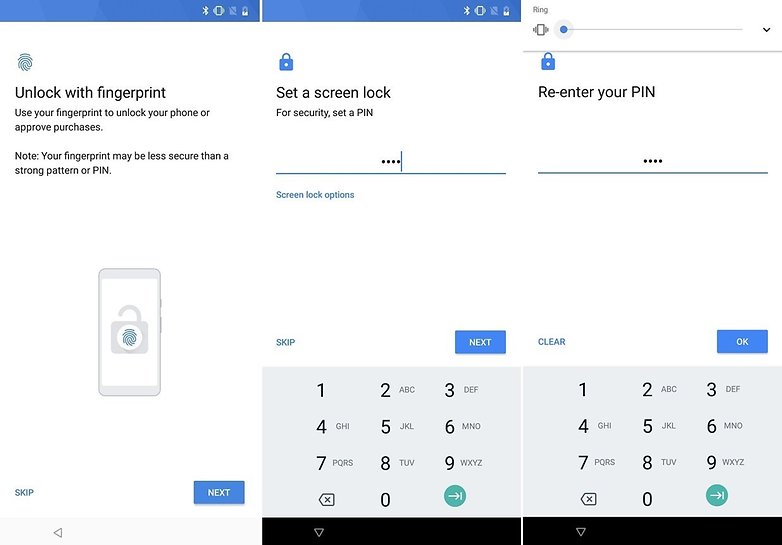
1. Select a language
Once you've switched on the phone on, you’ll arrive at a welcome screen where you will be prompted to choose a language. Tapping on the default language opens a list of all those available on the system. Select your preferred language from the list and tap the arrow to continue. This will set the language of the system and its menus, but you can choose to add extra languages to your keyboard later if you're multilingual.

2. Insert the SIM card and enter your PIN
Next, you will be asked to insert a SIM card. You can actually skip this, but assuming you actually want to use this device as a phone, it's an important step. Putting your SIM card in your phone can sometimes be a little tricky – Sony devices, for example, have flaps that you need to open, while most phones require inserting a PIN to open the slot. If you've got an older phone, then the SIM needs to go under the battery, in which case you will need to carefully open the back of the device.
You'll then be asked to enter your SIM's PIN number, which usually comes in the SIM package. This is a different PIN than the screen lock pin you may set later, which is used to prevent unauthorized access if someone picks up your devices.
After this step, you'll be prompted to select whether you want to start as a new user or import data from your previous device. Either way, you're going to want Wi-Fi next.
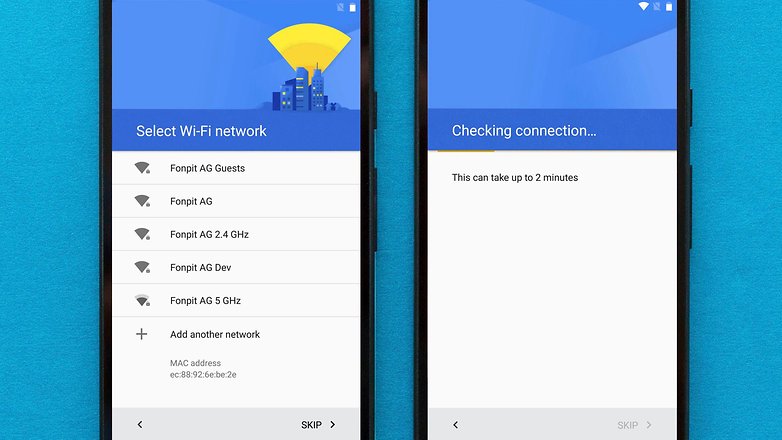
3. Select a Wi-Fi network
If you find yourself within range of a wireless network, you can now connect to it. Simply select your network from the list and enter the password if required. Then tap "Connect".
We suggest connecting to Wi-Fi at this stage so you can download updates and new apps as soon as possible.
4. Got another device?
At this point, you will be asked if you wish to copy your data from another Android device. If you can and want to do this, then do so. Otherwise, select to set up as "new user" and proceed to step 4.
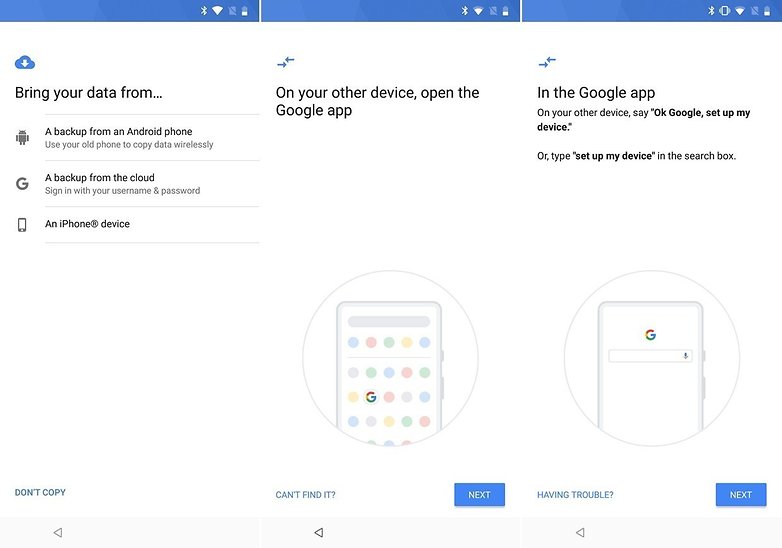
If you want to transfer from your old phone backups, it'll then prompt you to open the Google app on your old phone and either ask Assistant "Ok Google, set up my device" or go to Settings > Google > Set up nearby device. Or you can just sign in with your Google account to back up from the cloud, which is the next step.
You'd be surprised at just how much can be transferred over, from files to text togs, pictures and more. Take a look at our detailed guide on how to transfer everything to a new phone from your old one.
5. Set up/login to Google account (optional)
If you skipped the step above, the next stage is to set up or log in to an account in order to use your smartphone with Google's apps and services, such as Gmail or the Play Store.
If you already have a Google account, you can enter those details now. Then you will be asked to accept Google’s Terms of Service and Privacy policy. Read them (if you want) by tapping the highlighted phrases then hit “Accept”.
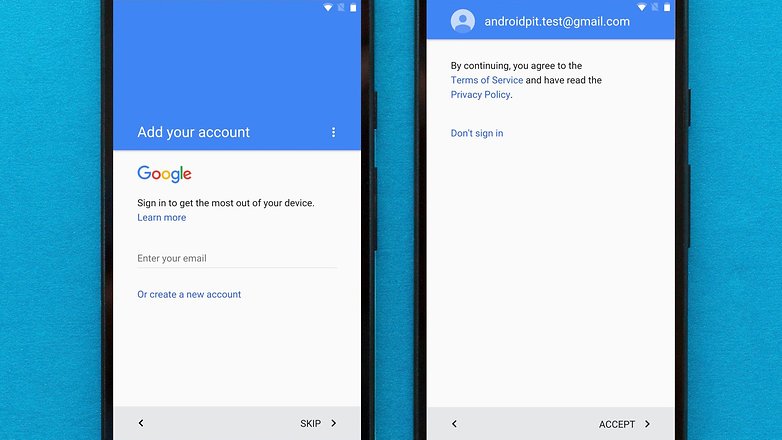
If you don't already have a Google account, but would like to set one up, just follow the steps to choose a username and create a password. You don't need to have a Google account to use the phone, but you will need one in order to use all of its functions, including installing apps from the Play Store. To get the best out of your new Android phone, you really should have a Google account.
Some manufacturers, such as Samsung, ask you during the registration whether you want to create an extra account. This is only necessary if you want to use some special services from that company. These services can possibly come in handy if you lose your phone, or if you want to take advantage of special features exclusive to your phone manufacturer's devices. You can simply skip this step if you want to.
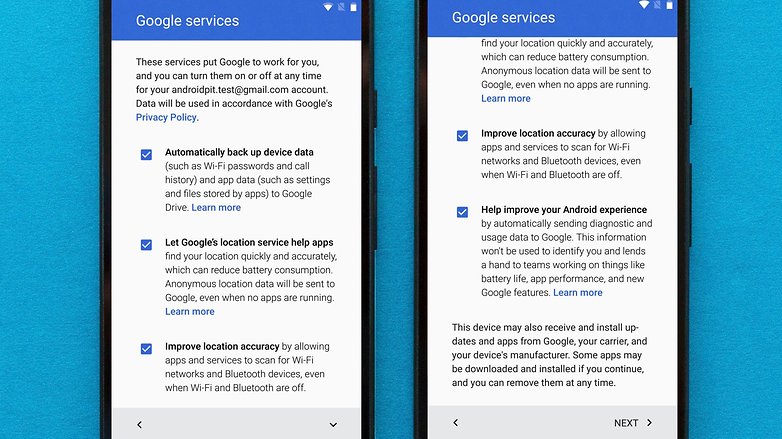
Google will also ask which services you would like to opt-into. This includes backing up your device, which is recommended in case anything should happen to your device. The others you can assess on a case-by-case basis. None of these are essential, and they can be switched on or off at any time.
6. Protect your phone
If you have an existing email address that you wish to sync with your Android phone, this is where you can add it. As with almost all of the steps in this list, this can be done at a later date.
Next, you will be asked if you want to secure your device. We strongly recommend this. Should you lose your device, this security measure is a key step in preventing unwanted access to your device. This can be done with face recognition for phones that support it, fingerprint recognition or with a simple PIN (distinct from the one for your SIM).
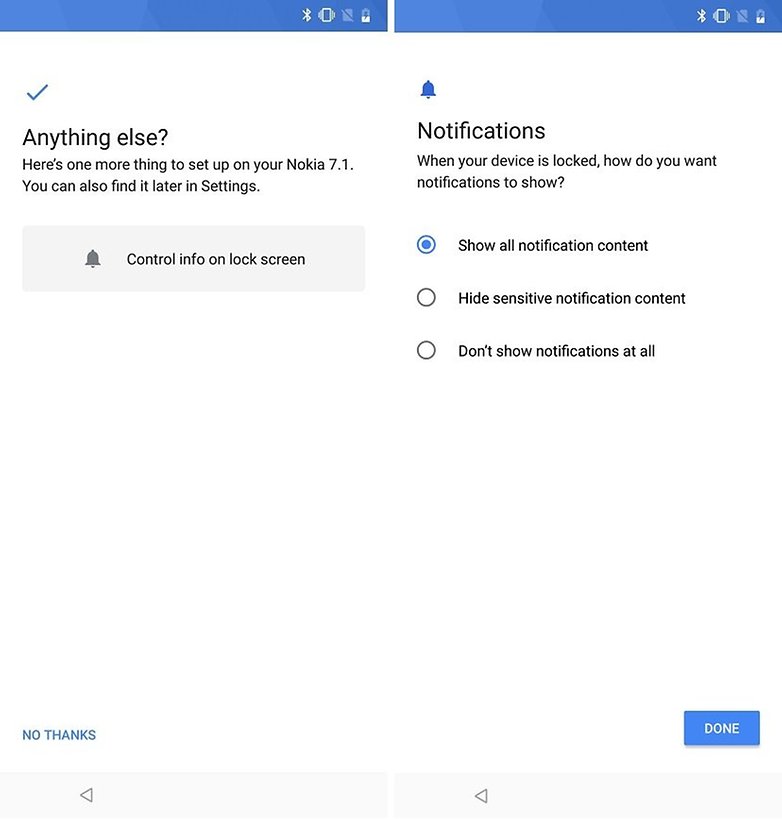
7. Notifications
In this section, you set up how your device displays content when your phone is locked. You have three options:
- Show all notification content means that, when your device is locked, if you receive a message, for example, this message will be displayed on your lock screen.
- Hide sensitive notification content will show some notification information, like that you have received a message, but will hide the content of the message.
- Don’t show notifications at all means you won’t see any notifications on your lock screen at all, but these will still be found in your device's notification shade.
8. Set up Google Assistant
The next step that you might see is an invitation to use Google's clever assistant. You'll be prompted to repeat certain phrases so that assistant can recognize your voice, which it should do so promptly if you've already set up Voice Match on another device.
9. Other services
Many smartphones come with pre-installed software, such as cloud storage services like Dropbox, Box or Google Drive. Some even come with Facebook or Microsoft Office! If you already have an account for these services you may be asked to log into them now, or you can register for the ones you want.
10. Insert your microSD card (if you have one)
If your phone has a microSD card slot, the last thing to do is to insert a microSD card, if you have one. This will provide extra storage space for your device to allow you to save more files. If you don't have a mircoSD card, consider buying one to save space on your phone's internal storage. You may not need the extra storage space at first. But, once you start downloading apps, getting large software updates, and taking pictures and video, you may find yourself needing more space.

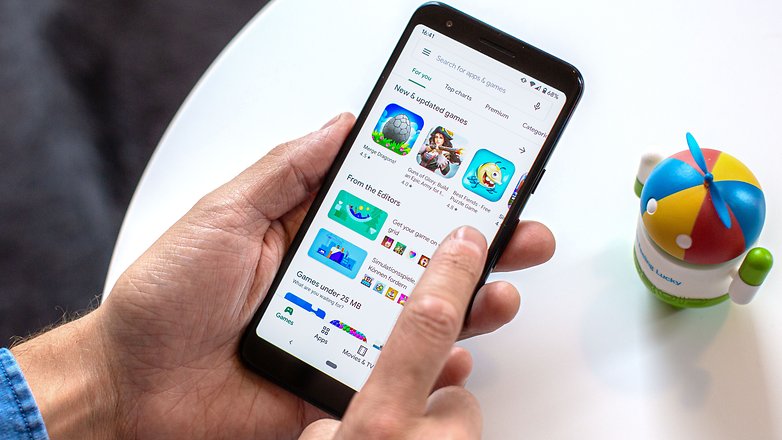
11. Download apps from the Google Play Store (optional)
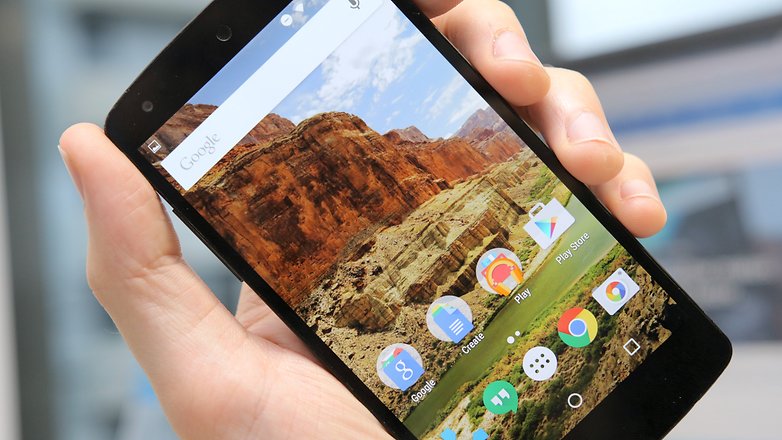
The initial setup of the smartphone is now complete. For an overview of the apps that have already been installed on your device, have a look at the app drawer. The app drawer is a list of icons for all the apps on your phone and chances are that you'll find this at the bottom of the home screen (the screen you should currently be on). The icon for the app drawer is a gray circle with six dots inside, which you can tap on from the home screen.
Now, look around your app drawer. If there are any apps you don't have yet that you want, you can go to Google's Play Store to download them. Don't worry, the Play Store itself will be installed on your phone already. Installing apps is a simple process and the handset will walk you through anything you need to do (like signing in).
If you don't find an app drawer, it means your phone doesn't have one. To find your apps in this case, simply swipe your finger left or right from the home screen to see your other home screens views where apps could be located.
Check out these best apps lists to get started:
- The best apps for your new phone or tablet
- The best apps of the year
- The best backup apps: never lose your data
- The best free Android apps
12. Install software and Android updates
When your Android is turned on for the first time, it might not be running the latest version of the software available for your specific model. For example, your phone could come with Android Pie out of the factory, even if that model has an update ready for Android 10, you'll have to download it after setting up.
To check to see if an update is available, simply go into the settings of your phone. The settings are found as an app in the app drawer or by going through the notification shade and tapping on the settings icon (usually a cogwheel or a set of tools of some sort).
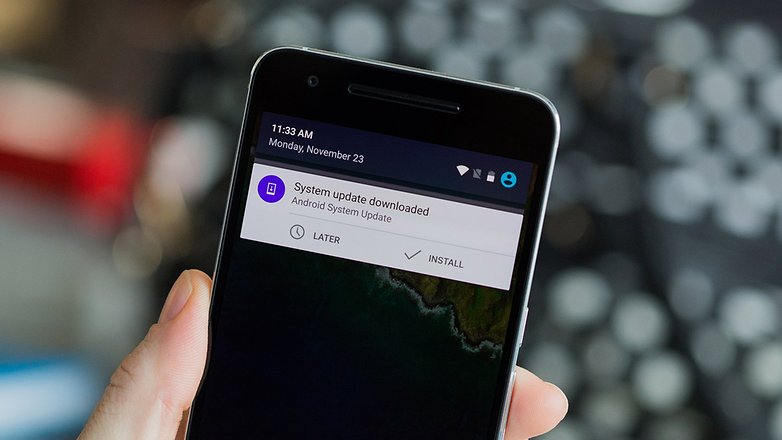
Find the About Phone tab, which is usually located at the bottom of the settings menu, and tap it. It will look different depending on your manufacturer. However, you will likely tap on something along the lines of "Check for software updates".
Software updates can take a long time to download and install, which can drain your battery and sometimes hundreds of MB from your mobile data plan. So, make sure that when you do this you are connected to a Wi-Fi connection and that your battery is at least 50 percent full. You should update to the latest version of Android available for your device because it (usually) provides more functionality, better battery life, and better security.
13. Personalize your phone
If you don't like the background image that came with your device, do not despair – every smartphone offers a selection of different backgrounds from which you can choose. The way to do this changes depending on the manufacturer, but look for Display or Wallpaper in the settings menu.
Quite often, if you press on the home screen anywhere for a couple of seconds, a window will appear that enables you to change your wallpaper.
If none of the options are to your liking, you could try out a new icon pack or test some other backgrounds – there are lots of these on the internet.
You should also check your phone's default sound settings. If you don't like the default ringtone, most phones come pre-loaded with alternatives. Make sure to adjust your ringtone and alarm volume to the appropriate level, too. You don't want your cell phone annoying everyone when you go out in public. You can also set the sound settings for when you tap menu items or type on your keyboard to silent, if you like.
How do you like your new Android smartphone? Did setting up your phone run smoothly? Let us know in the comments.


Why my pixel 4 device automatically resetting after one hour in my first use I just started from unboxing it
Play store it doesn't work
-
Admin
Dec 26, 2019 Link to commentVery clear list
Dear David Sir, Mark Sir, Nicholas Sir and to the entire Android Pit family, I wish all of you a very Merry Christmas and happy New Year. May you all always be very happy and healthy.
I have a stupid question. I just bought my mom a new Samsung and I still have to go do a sim swap for her to go from regular sim to nano sim. This will be her very first smart phone. But I would love to set up the phone beforehand. If I read this correctly, I can do 99% of the things using wi-fi. But how do I get back to the "Insert Sim" step? Or do I need to do them in order?
Hi, you can set up everything without a sim card. As soon as the new sim card arrives, simply insert it and that's it. Android is designed to work with any data connection available, it doesn't need the sim card.
The only thing you won't be able to set up without it are apps like WhatsApp that use the phone number as a log in.
Thank you! That makes me feel so much better. I appreciate the help :)
The two main steps I had when switching to a new smartphone were:
1) sign into your Google account (ie Gmail)
2) sync your Google account (confirm and your Contacts are all displayed)
Yes, you will need to update the new device with your Google Play Store and download some Apps (have your name / password ready for everything from Facebook to Twitter, because you will be signing in to many things).
Either then that? This is a useful article covering everything from signing into your phone, to installing a micro SD card and configuring it. 👍
This is a good rundown, my only change would be the sequence of updating the system (either available version updates or upgrades) to get all that out of the way before customizing the interface (e.g. launcher) and updating preinstalled or installing new apps. I personally also use the Recovery Menu / System Cache Wipe after any major Android system updates or upgrades to get rid of useless and often performance compromizing junk files. A fully updated and cleaned up Android is the better platform for personalization with new apps and settings.
hey, i have a quetion, i recently just hard reset my phone because i got locked out. but when i tried the first time setup it telling me to scan a QR code pls help me !! any suggestion ??
Thanks for sharing. It is pretty easy to setup an Android device but I guess newbie would find these instructions helpful.
Great and Good information , Useful for those who don't know about how to setup android phone for the first time.
Every one knows about how to setup android phone for the first time because now a days every one having android mobile in their pockets any way this article is useful for those who do not know how to setup android phone for the first time and you mentioned each and every step Clearly that's great.
Okay... I don't understand the significance of your comment...let alone, Point? lol
My launcher of choice, Nova Prime makes setting up a new one pretty easy. I copy the backup to the SD card, and transfer it to the new phone. Once the apps are reinstalled from the play store, I just restore the Nova settings and poof! Pretty much done.
From my experience and to prevent lot of headackes and battary drain symptoms
In the screen when Google services ENABLE and asks you the following:
[v] Automatically back up device data
[v] Let Google's location service help apps
[v] Improve location accuracy
[v] Help improve your Android experience
UNMARK THEM ALL !!
As an example if you ENABLE in this stage (at least in 6.0):
[v] Improve location accuracy
It will -by default- set location services in high accuracy each time you switch location service off/on
Even if you decided previously to set it as GPS only!
This result a battary drain issues
And as it say, you can always enable it afterward
So let it be in your hands and not in Googles hands
Remember that Battary is the most important device
Using Sony Xperia Z3
There should be a way on how to hook up ur phone with a sd card,never mind a sim card,using wifi now or better my zte n860
Can the SIM card go in after set up or is it needed for the initial set up?
Good article
My iPhone friends know I hate Apple. When they tell me that Android is complicated to use, I tell them: What you mean is that we have more ways of accessing settings and features. We have more choices, you don't.